How to Measure the Frame Size of A Mountain Bike
/ Tips / How to Measure the Frame Size of A Mountain Bike
The numbers associated with mountain bike frames vary a lot from one seller to another. So you might be wondering how to measure the frame size of a mountain bike. Mountain bike frame measurements will be the focus here and are fairly complicated. It is because different manufacturers use different techniques to provide their bikes’ geometry. It can be significantly different from others.
Besides, different manufacturers have different size categories, and they use different units to describe them. There is nothing universal when we talk about mountain bike frames. So the question is, how to measure the frame size of a Mountain bike?
In this post, we are going to find out the solution to this problem so that you don’t end up paying your money for a misfit. Carry on reading to find everything you need to know about it and be sure to watch the video posted and the end of this.

So why is Everything so Messy and Blurred?
The issue here is that manufacturers have always been sizing the length of a bike using the seat tubes. The trend (whether right or wrong) has been set by the road bikers. Now, this has nothing to do with mountain biking because both these styles are very different.
However, most of the roadies, when they got fed-up with road biking, turned to mountain bikes for an off-road experience. But the habit of using the seat tube height never changed. Therefore, measuring the seat tube height became an industry-wide trend. And now we see that it has turned into an industry norm.
Nevertheless, we are not saying that the length of the seat tube is not important when measuring a bike frame. But you need to consider various other measurements as well. You need to consider the reach, and it is closely followed by standover.
How to Measure Frame size on a Mountain Bike Then?

There are many factors to contribute to this matter. The length of the seat tube isn’t the only factor critical here. MTBs come in a range of different sizes, and measuring them is not a big deal. To get acquainted with the entire process, you must learn and understand the various components of your bike, how to get the measurements, and how to convert these numbers into useful information.
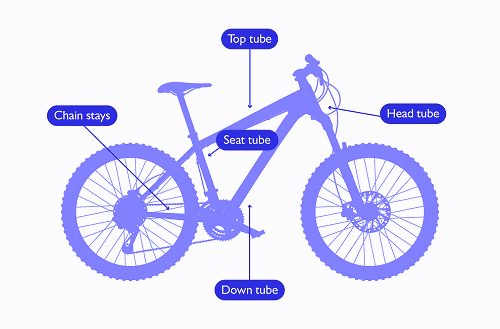
In most cases, you can measure MTBs with the help of their seat tube distance. It is the vertical portion of that triangle frame of your bike. This tube runs from the seat post’s bottom, and it links to the top tube right in the middle of your bike’s crank. The crank is the portion where the pedals are connected. The top tube is the horizontal tube in your frame, and the seat post is the tube with the seat on it.
Length of The Seat Tube
Use a measuring tape and find out the distance between your bike’s seat tubes. Take all the measures in a single unit. It is either centimeters or inches. The distance between the seat tubes is the frame size of your bike. You can compare it with the number mentioned in your bike’s geometry. Most of the manufacturers round it to the nearest number and then sell them with increments of 2 inches.
Reach (Length of the Top Tube)
Next up is measuring the top tube. It is the distance between the bike post and the handlebars. Therefore, it effectively tells you about reach, as we have discussed above. Adequate reach will make sure that you breathe comfortably while riding. Your back will remain comfortable, and so will your neck. Your brakes and gears will be easy to access too.
Measuring it is not very simple either because you will have to use a plumbline and a measuring tape to get the numbers. The best quality plumbline to consider here is Hexagon Plumb Bob by General Tools.
A good quality brand will have this measurement given in its bike geometry. Reach is critical because it tells you how the MTB is going to fit you.
If the reach is too short for you, then you will feel cramped when riding. If the reach is too long, then you will feel too much stretched out. Now, you can understand that both these situations are not too great for your posture. And staying in this position for long hours and on frequent days might result in developing some chronic issues.
Another reason why it is so important is that you cannot make adjustments to it, as in the case of a seat tube. Therefore, no matter what you do, a bike that feels too cramped will always have a small frame, and you’ll stick with it until you decide to stop using the bike.
Standover
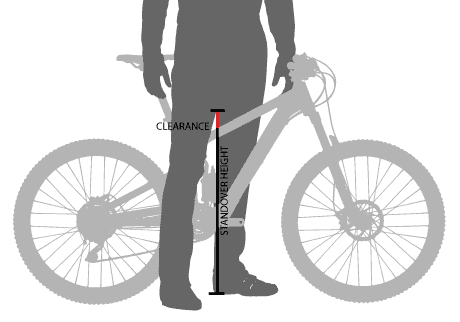
The best practice to find the right size is to visit your local bike shop and then straddle an MTB. There should be a clearance of 2 inches, at least from the top tube to your crotch. Furthermore, your feet should be able to touch the ground comfortably. Measuring this is determining the standover of a bike.

The correct size will be adding a couple of inches to the height of the top tube from the ground. Standover is also available in the geometrical charts of a bike. But you also need to measure the inside of your leg front to the ground. For instance, if your inside leg is 28-inch long, then you should go for a bike frame with a top tube height of 24 inches. Add a couple of inches to it, and you will get 26-inch. So the right standover size in this scenario will be 26 inches. Don’t go for a 30-inch standover; otherwise, prepare yourself for some pain.
Some Other Measurements To Consider
Here are some other measurements that you need to take if you are looking for the right type of MTB according to your body

Stack
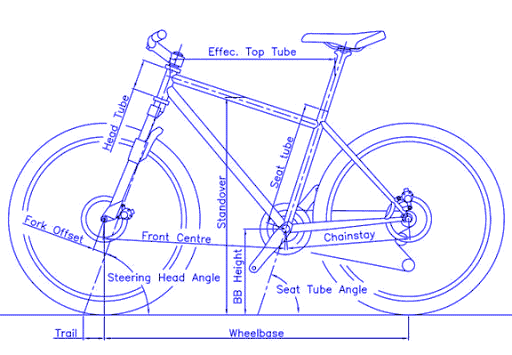
The distance (vertical) between the bike’s head-tube top and its bottom bracket! With this measurement, you will find out how much of the arm stretch you will have to make to control the handlebar while being seated in a comfortable position on the saddle.
Wheelbase
The distance between the rear and front axle of your bike is its wheelbase. It will tell you about how comfortable the ride is going to be and will vary with the frame size. However, you must keep the fork of your bike straight to get the correct measurement. The precision in your measurement will increase significantly if you measure the wheelbase from both sides of your bike.
Front Center & Chainstay
We have mentioned the wheelbase to be the distance between both the axles of your bike. But keep in mind that wheelbase isn’t the sum of chainstay and front center because the wheelbase is measured in a straight horizontal line. Front center and chainstay are not measured in straight horizontal lines.
The chainstay is the distance between the rear axle and the crank wheel front center is the distance between the crank and the front axle. Bike frames with short chainstays are more responsive as compared to longer chainstays. On the other hand, the front center is going to influence handling along with toe overlap from the crank with your bike’s front wheel.
Angles Of Head And Seat Tube
Both these angles are very critical when we talk about how good an MTB is in handling. If the angles are upright, the handling will be agile. Just make sure that your bike is standing vertically upright with the horizontal ground. It is better to measure the head angle with the front axle as a base and keep the base angle 0-degree with the ground. You should measure the seat tube angle with the rear axle while keeping the base angle 0-degree.
Height And Drop Of The Bottom Bracket
Drop here refers to the difference between the crank axle’s centerline and wheel axles’ heights. Determine the rear axle height as well as the bottom bracket height. Subtract both these numbers.
The height of the bottom bracket is the ground distance of the center of the shell of the bottom bracket. Make sure that your bike is upright with the ground to get the measurements right. Don’t forget to flatten your tires for exact measurements.
Most Commonly Available Sizes
You need to understand how manufacturers label and sell their bikes. The most common sizes available are 19-inch, 17-inch, and 15-inch. They generalize these sizes into categories like large, medium, and small. Anything over 20-inch is in the extra-large category and anything under 15-inch falls in extra small!

Now that you have taken the measurements on your bike frame, it’s time to get the right size according to your height. The following mountain bike frame size chart will allow you to find the right size as per your height.
Mountain Bike Frame Size Chart
| Rider’s Height | Traditional | Semi Compact | Compact | ||||
| Ft, in | Seat tube | Top tube | Seat tube | Top tube | Sloped top tube | Seat tube | Sloped top tube |
| 5’3” to 5’5” | 51.5 | 52.5 | 50.0 | 51.5 | 52.5 | 42.0 | 52.0 |
| 5’5” to 5’7” | 53.0 | 54.0 | 51.5 | 53.0 | 54.0 | 46.0 | 53.0 |
| 5’7” to 5’9” | 54.0 | 55.5 | 53.0 | 54.0 | 55.5 | 50.0 | 56.5 |
| 5’9” to 5’11” | 55.5 | 57.0 | 55.5 | 55.5 | 57.0 | 54.0 | 58.5 |
| 5’11” to 6’2” | 58.0 | 58.5 | 57.5 | 57.0 | 58.5 | 58.0 | 60.0 |
If you are looking for the right frame size based on your height without the complication of reach, standover, or seat tube length, then the following mountain bike size chart will help.
| Rider’s Height | Most Suitable MTB Frame Size | |
| Ft, in | Frame Size in Inches | Frame size by Category |
| 4’10” to 5’2” | 13” to 14’ | Extra-small |
| 5’2” to 5’6” | 15” to 16” | Small |
| 5’6” to 5’10” | 17” to 18” | Medium |
| 5’10” to 6’1” | 19” to 20” | Large |
| 6’1” to 6’4” | 21” to 22” | Extra large |
| 6’4” to 6’6” | 23” to 24” | Double extra large |
Why Do Mountain Bike Frame Measurements Matter?
Size is going to matter a lot when it comes to mountain bike frames. Finding out how to measure mountain bike frames will not matter if you don’t know what influence they have on your overall ride. There are various other factors at play, too, but your mountain bike frame has a significant role.
Mountain bike frame measurements are important for overall ride comfort and rider safety. If you had ever used a bike that was too big for you (probably when you were a child, trying out an adult MTB), you would have noticed that your feet can’t reach the pedals. Now imagine it riding on mountain terrain!
It will be incredibly stressful for you, and you won’t feel comfortable at all. It will particularly be the case on advanced trails. Therefore if you want your bike to be secured and comfortable, then you need to know how are mountain bike frames measured and choose a bike that’s best for you.
If you have the right size of your mountain bike, you will be able to use it effectively in your maneuvers, and it escalates your overall performance. And many professionals in this field agree to it. It is not life-threatening to use a bike that is not the right size, but your ride’s safety and comfort will allow you to be more comfortable on the wheels. You might end up injuring yourself if you continue to ride a wrong size bike.
Check out this great video when it comes to sizing your next mountain bike.
Conclusion
There you have it. Now you know how to measure the frame size of a Mountain bike so you can buy the best mountain bike according to your body size.
Of course, you need to use the knowledge and take all the measurements correctly. It will make sure that you can get the most out of your ride. You will significantly reduce any chances of injury and will be more confident in your moves. And we all know that self-confidence matters a lot in the world of mountain biking.
Getting bike frame measurements right and choosing the size according to your body will surely get you on the way to make the right choice. And you’ll have something to brag about with your friends too when you help them out in finding the right size for themselves too.
Now you know how to measure the frame size of a mountain bike and can help the next rider!
Related Articles
What Does Travel Mean On A Mountain Bike?
Oli L • March 22, 2022
When you start mountain biking you will hear the term "travel" quite a bit. But what the heck is travel and what does it have to do with mountain biking? "Hey, dude, how much travel do you have on your front fork". This is something you will hear often and it's referring to how much suspension you have on your bike. Travel on a mountain bike is the distance you...
What Is A Mountain Bike Dropout?
Oli L • March 1, 2022
The Mountain bike dropout is not a topic of most conversations when it comes to mountain biking. These components are located on the fork-end and features a section in the frame or the fork, where the wheel can quickly be loosened and removed in the need of a wheel change. In more technical terms, it refers to a slot located in the rear axle of the mountain bike, that allows...
How to Manual on a Mountain Bike
Oli L • November 9, 2021
When you're cruising on a mountain bike or pacing through a trail, you face different problems. One such problem is the obstacles that you face while conquering trails. To overcome these obstacles, there's a popular skill that is known as a manual. With a manual, you can pass over these obstacles in style and comfort. And like every skill, this mountain biking skill requires practice. Because without practice, even if...
How To Clean Disc Brakes on A Mountain Bike
Oli L • October 21, 2021
Want to learn how to clean disc brakes on a mountain bike? Here you’ll find out what you can use to clean your mountain bike disc brakes, how to detach the disc brakes and their entire cleaning in your garage. Mountain Bike Disc Brake Cleaning Overview You can clean your mountain bike disc brakes after removing your wheels, wiping those brakes with brake cleaner and a clean rag. You can...
Hydraulic Disc Brakes Vs. Mechanical Disc Brakes
Oli L • September 9, 2021
One of the most common topics in the biking world is "hydraulic disc brakes vs. mechanical disc brakes." And so it should be because most of the bikes either come with hydraulic disc brakes or mechanical ones. Hydraulic disc brakes are the dominant of the two. These brakes are complex but reliable. However, mechanical brakes are under-performing but straightforward than their counterparts. So, which one will be better for your...
Latest Articles
Popular Articles
Product Of The Week
Monday 2nd June
