How To Adjust Mountain Bike Brakes?
/ Tips / How To Adjust Mountain Bike Brakes?
Bike brakes are one of the most critical components of your MTB. And they can only perform their function well if you maintain them properly. For your riding safety, you have to check them regularly. You want to be 100% sure that the brake pads and cables are working correctly. Learning how to adjust your mountain bike brakes will be a skill learned.
For your bike brakes to be highly responsive, you need to take care of them. If any of the components wear out, the entire system will fail, and your bike won’t stop in time. It’s a massive safety hazard, and you need to avoid it. If you set the pads or cable either too low or too high, your bike’s braking system will face issues. Hence, you must keep a close eye on all such issues and avoid getting into any accidents.
In this guide, we’ll show you how to adjust mountain bike brakes without any external assistance. So let’s get on the way with some of the primary types of bike brakes.
Different Mountain Bike Brake Types
No matter what kind, all bike brakes are designed to make sure that your bike stops by halting the spinning wheel. But as simple as it may sound, there are still different types of mountain bike brakes. The different kinds of mountain bike brakes are designed for different trails and weather conditions.
For instance, some of them have a purpose of slowing your MTB down. Others are for putting your bike to a stop. Some kinds of MTB brakes are very light in their gripping power, while others are extremely powerful.
For understanding the process of how to adjust mountain bike brakes, we need to look at each of them briefly!
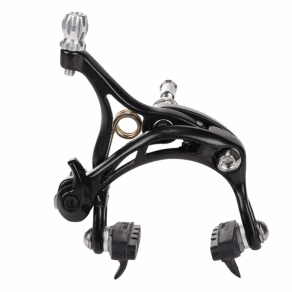
Caliper Brake
This braking system is one of the most popular options. There are two arms present in a caliper brake system like this SRAM Rival 22 Brake Caliper. One arm is attached to the cable, and the other is attached to the sleeve of the cable. The system clamps the rim in the middle of the two arms. These arms have brake pads.
Band Brake
The system develops friction between the tethering band and the rotating rim. It uses it to stop the rim from rotating like this AlveyTech 80 mm Bicycle Rear Band Brake Assembly. This system is very effective in slowing your bike down, so if you are interested in instant stopping, then you better overlook it.
Drum/hub Brake
In the yesteryear’s of mountain biking, this braking system was very popular. But it lost all its steam once disc braking systems entered the market. These brakes wear out fast, and the system features a couple of drums that are present on the arms to ensure grip. Although the system works better than its band or caliper counterpart, you can only use it to stop the bike slowly. There is a reason why drum braking system faded out over time, and we’ll discuss it in the following text.
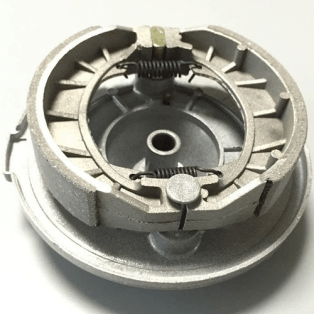
Coaster Brake
Coaster brakes are on the rear end of some MTBs, and it can perform two separate functions. It allows your bike to cruise and doesn’t allow the pedals to roll, and of course, you can use it to pedal backward. Backward pedals can stop the bike instantly. However, you need to be in a very commanding position to do so. With a lack of experience, it can be hazardous for you. So, essentially, you have a back gear on your MTB!

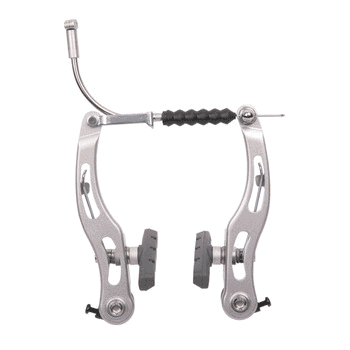
Cantilever Brake
Cantilever or V-brake like the Avid Shorty Ultimate Front Cantilever Brake are a hub system, and it has both brake pads on both the brake arms with brake cables. This cable comes from the handlebar and over the wheel while its pivot is under the brake show. The cantilever braking system is ubiquitous, and it has an outstanding stopping power.
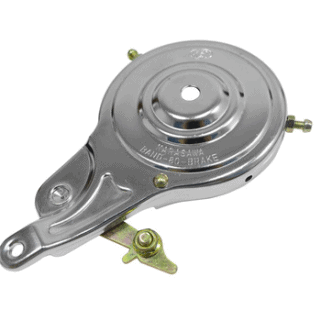
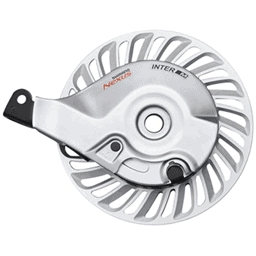
Roller Brake
With this brake system, you can directly apply force on the central rim of your bike’s wheel. The spinning system can work against the spinning wheel and stop it. The advantage of using roller brakes like the Shimano Nexus Bicycle Roller Brake is that you can remove them from your bike without any problem. The traditional drum brake system never had this feature.
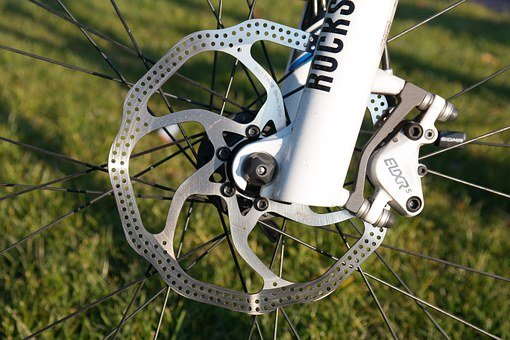
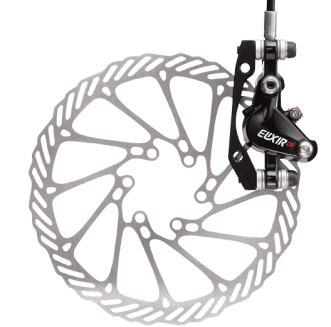
Disc Brake
Disc brakes like the JGbike Shimano MT200 MTB Hydraulic Disc Brake Set have become the most popular braking systems for mountain bikers. These brakes are more powerful than any other braking system and are far more reliable. Moreover, this braking system doesn’t wear out quickly. It is equally effective on all terrains, and it will never overheat. The disc brake system also doesn’t wear your tires out.
How To Adjust Mountain Bike Brakes – Key Points To Remember
MTBs have different types of brakes on them. And after going through them all briefly in the above text, it’s time to address the question of how to adjust mountain bike brakes. But first, you have to keep a few points in mind. In this section, we’ll list down those points for your convenience before you get to the adjusting part!
Visual Checks
First, you need to conduct some visual checks and see if the system is in its place or not. Cantilever brakes or V-brakes have a quick-release system that allows you to remove the wheel with ease. There is a J-shaped noodle that you can conveniently disengage from the cradle.
Side pull braking system features a quick-release lever on the clipper. It allows you to widen the brake. Make sure the lever is close to the wheel, or the pads will be too distant from the rim to be effective.
Other braking systems need you to be a lot more thorough in your visual checks. But be sure to check that the brake pads have enough thickness in them to deliver stopping force. If you’re dealing with some sort of grinding sound and you hear it when you press the brakes, then the padding is gone, and the sound is coming because the metal is coming in contact with metal. In such a scenario, you will only need to replace the brake pads and nothing else.
Check The Brakes
Checking the brakes is the first step that you need to take before you get to the process of how to adjust mountain bike brakes. There is no need to open up everything with haste. First of all, make sure the system is not working and what you can do to fix it without unscrewing anything. See if your brakes are in working conditions and how much adjustment you have to make to correct them.
Squeeze your bike’s brake lever (either one) and move the bike in one direction. If you’re checking the front brake, move the bike forward. When you’re checking the rear brake, move the bike backward. If you’re pressing the front brake, then moving your bike forward should lift the rear wheel and vice versa.
Your brake lever should not be touching your grip. If this is the case, then you’ve got a faulty brake cable. You can buy a new one; Shimano Universal Standard Brake Cable Set is a MTB cable you’ll find on the market.
Adjusting The Brake Pads
Before adjusting, you need to see whether the brake pads are worn out or not. If that’s the case, then you need to replace them. However, if your brakes pads are fine, then some adjustments are a must. In the case of V-brakes or side-pulls, you must bring in the pads with the rim’s surface line.
If you set the brake pads too low, then they’ll develop a lip. This lip will keep the pad against the rim. If the pad is too high, it will start hitting the tire, which will result in quick wearing out of your tires. You must undo the bold to reposition the brake pads.
Tighten the brake carefully as you are holding the wheel rim. In case of disc brakes, fix the pad first and then the piston. Just move it in or out following the rotor distance. You must reach it through your wheel’s spokes using a Torx screwdriver set by Amartisan or an Multi Tool 19 Gold from Crank Brothers. Just turn the key counterclockwise if you’re looking to move the pad away from the rotor.
Adjusting The Brake Cable
Check to see whether your bike has a cable or not. If there is no cable in the braking system, then you can skip this entire section and move on to the next one. You will only need to make adjustments to your brake pads, as illustrated in the text above.
Braking systems that feature a cable come with a barrel adjuster. A barrel adjuster is a knurled bolt hollow on the inside, and the cable is inside it. Through this barrel, the cable goes out into the clipper from the lever. Some MTBs also have inline adjusters right along the cable outer.
Tensing The Cable
If you are looking to increase the cable’s tension, you must turn the barrel counterclockwise. Just one full turn will work at first, and then carry on with the half turns in the same direction while checking the brakes. If your MTBs barrel adjuster has a lock nut, then you must unscrew it first/ and then start turning the barrel adjuster. When you’re done, you’ll have to screw it back in to make sure that the cable stays in its new position.
Reclamping Cable
Reclamping will work if adjusting the cable tension didn’t provide you with the results. Unscrew your barrel adjuster and widen it and then unscrew the bolt anchoring the cable. You have to do this simultaneously. Use one hand for squeezing your MTB’s braking system and use the other to keep it in place.
In case of V-brakes/side pulls, you just have to hold the blocks up against the rim. In a disc brake system, the caliper’s arm must be pulled back. This way, you’ll keep the brake engaged. You need to pull the caliper’s arm to keep the brake engaged. It must be in touch with the surface of the rim. But keep it in your grip until reclamping is done. After that, you can let it go.
Now, with your other hand, pull out some more cable until it is just tight enough. Now tighten the clamp without letting the cable go. There should be enough slack to ensure that the pads are not rubbing the rotor or the rim. Now hold it tightly and pull the cable through to the previous position of clamping.
Centering The Braking System
In several cases, only one of the braking pads is touching the rim of your MTB wheel. Therefore, you must center the braking system to fix the issue. In case of side-pull brakes, you’ll have an adjuster to fix the problem. It will be present right on the top of the caliper on one side of the side-pull brake. You must screw it either in or out to adjust. And with the screwing, you’ll see the arms of the brake moving towards or away from the rim.
If there is no adjuster of such a kind on your MTB, then you must slack the bolt and hold the braking system close to the fork. You must move the braking system and then tighten the bolt. Cantilever brakes also have this screw on both arms right at the bottom. You will fix the tension of the spring by screwing it in.
You can also bring the brake pad close to the wheel rim and lower the tension of the rim if you unscrew it. Just determine the position of the brake pad by checking the tension on either side of the braking system.
For disc brakes, you’ll need an Allen key and use the bolts present on the system. Just unscrew the system enough to make the system movable from one side to another using your hand. Squeeze the lever and press and hold the brake in full. Now tighten the bolts using the Allen key.
Conclusion
How to adjust mountain bike brakes is not a complicated process if you know what to do. However, if you want to do it the right way, then you need to follow the instructions above carefully.
Different kinds of braking systems function differently. You must identify the problem and determine which area of the braking system required fixing. You must identify different types of bolts and cables involved in your bike’s braking system to get used to it.
After that, fixing won’t be a thing. And it will be hugely beneficial for you when you are on the road and look to make some adjustments to your MTB’s braking system. There are times when you don’t have access to any professional assistance nearby. If you know how these braking systems work, you will sort out and solve the problem yourself with the right tools in hand.
Related Articles
What Does Travel Mean On A Mountain Bike?
Oli L • March 22, 2022
When you start mountain biking you will hear the term "travel" quite a bit. But what the heck is travel and what does it have to do with mountain biking? "Hey, dude, how much travel do you have on your front fork". This is something you will hear often and it's referring to how much suspension you have on your bike. Travel on a mountain bike is the distance you...
What Is A Mountain Bike Dropout?
Oli L • March 1, 2022
The Mountain bike dropout is not a topic of most conversations when it comes to mountain biking. These components are located on the fork-end and features a section in the frame or the fork, where the wheel can quickly be loosened and removed in the need of a wheel change. In more technical terms, it refers to a slot located in the rear axle of the mountain bike, that allows...
How to Manual on a Mountain Bike
Oli L • November 9, 2021
When you're cruising on a mountain bike or pacing through a trail, you face different problems. One such problem is the obstacles that you face while conquering trails. To overcome these obstacles, there's a popular skill that is known as a manual. With a manual, you can pass over these obstacles in style and comfort. And like every skill, this mountain biking skill requires practice. Because without practice, even if...
How To Clean Disc Brakes on A Mountain Bike
Oli L • October 21, 2021
Want to learn how to clean disc brakes on a mountain bike? Here you’ll find out what you can use to clean your mountain bike disc brakes, how to detach the disc brakes and their entire cleaning in your garage. Mountain Bike Disc Brake Cleaning Overview You can clean your mountain bike disc brakes after removing your wheels, wiping those brakes with brake cleaner and a clean rag. You can...
Hydraulic Disc Brakes Vs. Mechanical Disc Brakes
Oli L • September 9, 2021
One of the most common topics in the biking world is "hydraulic disc brakes vs. mechanical disc brakes." And so it should be because most of the bikes either come with hydraulic disc brakes or mechanical ones. Hydraulic disc brakes are the dominant of the two. These brakes are complex but reliable. However, mechanical brakes are under-performing but straightforward than their counterparts. So, which one will be better for your...
Latest Articles
Popular Articles
Product Of The Week
Monday 15th April