How To Bleed Mountain Bike Brakes?
/ Tips / How To Bleed Mountain Bike Brakes?
If you’re new to the idea of mountain bike brake bleeding, you might be thinking bleeding mountain bike brakes must be an uphill task. But the reality is quite contrary to it. You might also be thinking why should I have to do it when I can visit my local bike shop to get it done.
We would say you should save where you can and invest where you need to. How to bleed your hydraulic mountain bike brakes is the primary question that we will be addressing in this post.
Besides, brake bleeding is no rocket science for which you need to be a graduate. You just need the right kind of bleeding kit and some relevant knowledge to get through the proceedings. Once you are done with this entire process, you will bring new life to your Mountain bike brakes.
So let’s begin with how to bleed mountain bike brakes…!
What’s Brake Bleeding And Why Should I Do It?
Bleeding mountain bike brakes means getting rid of air bubbles from the brake fluid that is in the hydraulic brake system of your mountain bike. This process is also used to purge this system when replacing with a new one and you can execute both in the processes simultaneously.
Your local bike shop can charge you a lot for the process and you will have to wait to get your bike back. Therefore, it’s better to get the process done all by yourself to save time, money, and of course, learn a new skill.
What Tools Do You Need For Brake Bleeding?
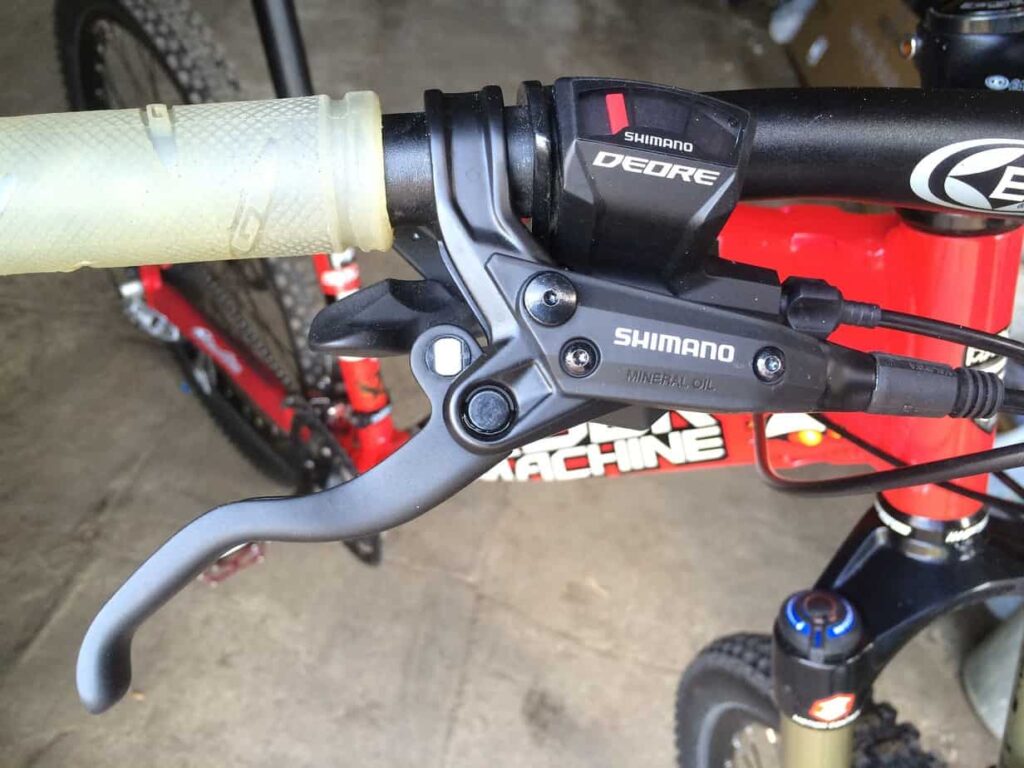
Make sure if you have a Shimano brake system, you need to go for the Shimano Hydraulic Mineral Oil to make sure that the internal parts of your braking system don’t get damaged. Eventually, you will need an original Shimano bleed kit.
If you have SRAM, go for the SRAM Standard Disc Brake Bleed Kit and keep in mind that SRAM uses DOT oil. The oil will usually come in the bleed kit but you can buy it separately.
Most of these bleed kits feature a bleed cup, a syringe, and a catch bottle for your oil. It is better not to use a syringe so that there are no chances of getting any dust in the brake lever. Plus, you will need a bleed block to make sure that the pistons remain part of the bleeding process. You will also need a Phillips screwdriver, a 7-millimeter wrench, and a whole set of Allen keys.
First, You Need To Get Rid Of The Air Bubbles
For your mountain bikes hydraulic brakes, you need to get the air bubbles out, to ensure that they work properly. The fluid needs to be incompressible so that the braking forces are transferred comfortably.
You create input forces when you press the brake lever and these forces travel through the fluid to make the pistons functional and the brake pads in contact with the rotor. This mechanism will only be possible when the fluid is completely in-compressible.
Therefore, your brake fluid proves to work as a communication medium between your brake lever and your brake piston. And if there are air bubbles in the fluid then the medium is distorted and communication will not be very effective. Therefore, you first need to get rid of all the air from the fluid.
How To Know If There Are Air Bubbles In The Brake Fluid?
The classic sign of the presence of air bubbles in your brake fluid is loose or spongy brake lever. If you have to press the lever for a significant distance then air bubbles will be in your brake fluid. If you don’t have to press your brake lever a lot, your brake fluid won’t have many air bubbles in it.
Now the question is how did the air bubbles form in the first place?
Well, it can happen when you shorten your brake hoses and open them to air. You might lose some brake fluid this way and some air may enter the system. Perished seals, damaged brake lines or joints can also lead to air bubbles entering the brake system.
And it results in making your brake lever feel spongy. There are times when you need to bleed your new brakes as well. And this occurs if your local bike shop or even the bike manufacturer has failed to perform the task adequately.
Renewing The Fluid
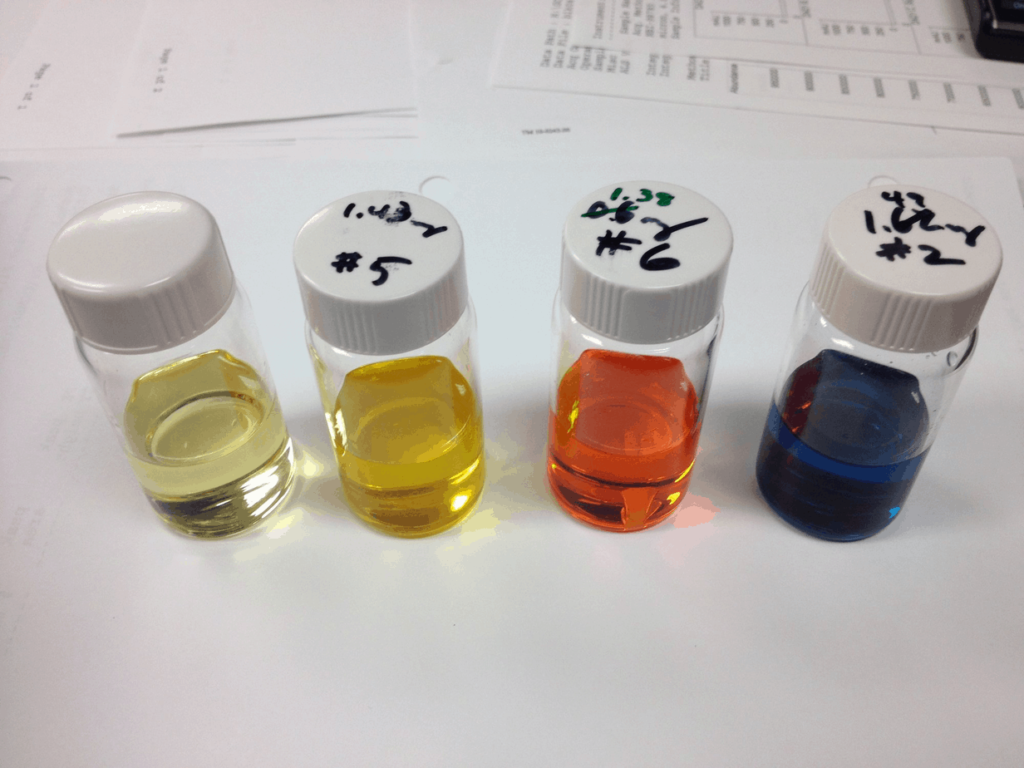
Periodically changing your brake fluid is part of the general maintenance of your brake system. With time, the fluid gets old and it loses its color due to contamination in the environment. Air, water, and dirt are the elements to contaminate the fluid. Therefore, you will have to change the brake fluid occasionally to keep the contaminants under check and allow your brake to perform well.
How Does Water Affect The Brake Fluid In Addition To Air And Dirt?
Air is the worst to affect your brake fluid and water is right next in line. Too many air bubbles will render your brake completely useless right away, water will start creating problems over a longer time. Based on which brake model your MTB uses: mineral oil or DOT brake fluid, water will affect your stopper differently.
DOT brake fluid can absorb water from the surroundings through the pores that are there in the hydraulic line. It can adversely impact the overall performance of your brake fluid influencing its boiling point. On average. Your DOT brake fluid can gain about 3.7% of the water through its service life of 2 years. With a reduced boiling point, your brake fluid has low resistance to high temperatures.
Mineral brake fluid is different as it doesn’t absorb water but repels. It can cause the water to pool in various low spots due to heavyweight throughout the system. The results are again the same, as the brake system loses its boiling point and ability to resist high temperatures. This increases the corrosion chances within the internal parts.
How Often Should MTB Brakes be Bled?
There is no set schedule for this but as soon as you find your brake levers to be loose or spongy, it is time to bleed your brakes. Some riders get to bleeding only when they think it is impacting their braking mechanisms.
But, you need to get rid of the air because it can damage the internal parts of your braking system for good. MTBers who participate in races can go for brake bleeding on an annual basis. But for the regular MTBers, every 2 years would be a suitable option.
8 Steps Involved In Bleeding Your Brakes
Here are some important steps that you need to keep in mind when bleeding your brakes.
1. Raise Your Brake Lever
Make sure that you raise your brake level parallel to the ground with the help of your 4mm Allen key.
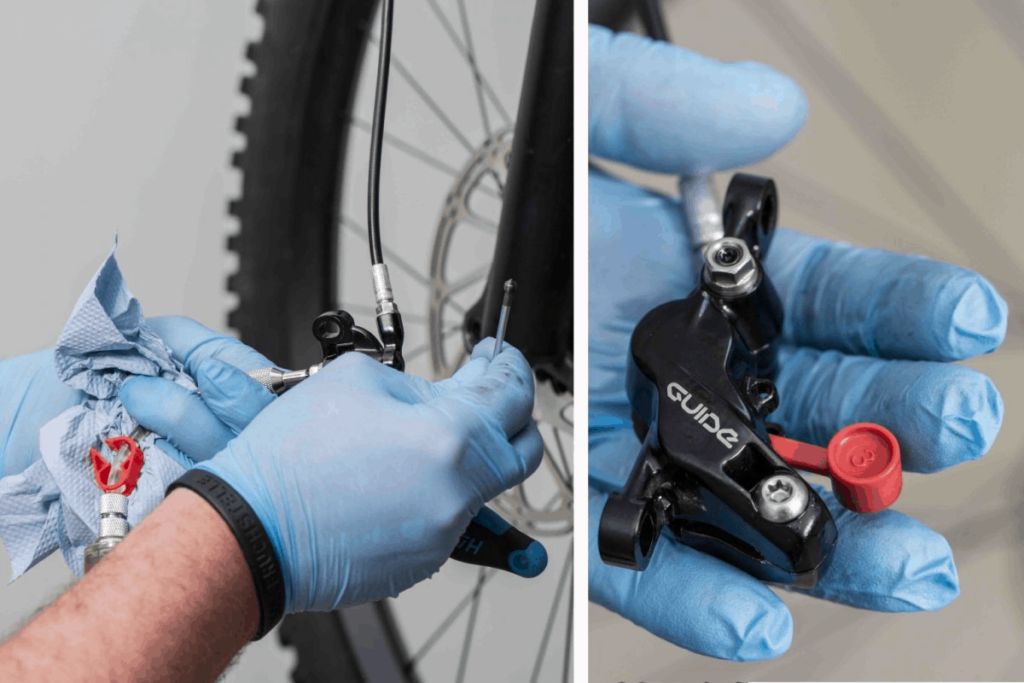
2. Remove The Wheel
Now, remove the wheel and place it aside. Use your 3mm Allen key to remove the brake pads. Just make sure that you don’t get the pads contaminants with the brake oil.
3. Get The Bleed Block In Place
It’s time to install the block from your bleed kit by securing it in your caliper and securing it with a bolt using your 3mm Allen key.
4. Get Your Bleed Cup In Place
The next step is to place your bleed cup on your MTB’s brake lever with the help of a 2.5mm Allen key and don’t loosen the o-ring rubber at the base. Also, make sure that you don’t cross-thread your bleed cup right into the lever.
5. Attach The Bottle
Now, attach the bottle for oil catching to the caliper and make sure that you push the line to fit. Securing it properly will make sure that no air enters and no oil escapes.
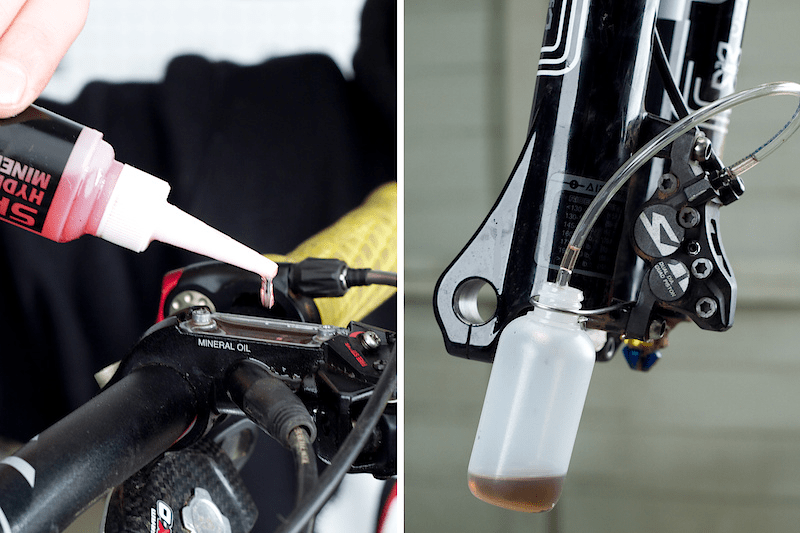
6. Pull The Plug Of Your Bleed Cup
The next step is to pull the plug that is sitting right in the middle of your bleed cup. With the help of your 7mm wrench, you can open your bleed port right at that caliper. Ensure to top off the cup with mineral oil and prevent any entry or exit of air into or through the system.
7. Pull The Lever
After that, pull the lever and keep it closed. Tighten your bleed port using your 7mm wrench and release the lever. As soon as you do that, you can open the port again.
8. Close The Caliper And Install The Brake Pads
Close the caliper port with the help of your 7mm wrench and get rid of the used oil. It’s time to clean the clipper and install the brake pads back. At this point, your bleed cup will be half full. And it’s time to get rid of the air bubbles.
Use your 4mm Allen key and loosen the clamp on your handlebar to get rid of any bubbles. It’s time to get your bead cup off the lever and install the bleed lever screw. Now just clean the brake lever and make readjustments to the lever positions according to your preferences.
5 Tips To Successfully Get Through The Brake Bleeding Process
Being a first-timer, you must keep clear of any mistakes or end up making even a bigger mess of the task that is at your hand. So here are some tips that you must consider when going through the brake bleeding process.
1. Keep Your Rotor And Brake Pad Free From Any Contamination
You have to make sure that none of the brake fluid gets in touch with your brake pads. Any fluid spillages can spoil your brake pads. You can get this sorted out by removing your wheel first hand and the brake pads along with it. You will be using a bleed block and will save your brake pads from getting contaminated.
2. Avoid Using The Wrong Brake Fluid
As mentioned above, there are two types of brake fluids. One is the DOT oil and the other is mineral oil. It is not important which oil you choose, but you must use the one that is suitable for your brake system. Most of the manufacturers stick to one type of brake fluid and they mention it as well, you need to make sure that you always shoe the same as well.
3. Avoid Using Brake Fluids From An Old/Outdated Bottle Or Container
You have to be 100% sure you are not using brake fluids from an old container or bottle. Over time, that particular brake oil might become contaminated and will not remain effective anymore. Therefore, do not use brake oils from old bottles or containers under any circumstances. It is better to place your fluid in several small bottles as you won’t have to open each bottle each time you are using the fluid.
4. Do Not Over-Tightening The Bleed Fittings And Adaptors
Assure, you don’t over tighten these bleed fitting and adaptors. Use those o-rings to keep things airtight and prevent any development of air bubbles. With over-tightening you can also damage these o-rings. Only finger tight the fittings and don’t use any tools.
5. Avoid Overfilling Your Brake System
You also need to curb the urge of overfilling your brake system to enhance performance. Over-filling has nothing to do with enhancing your braking power. You can avoid overfilling if you don’t reset the position of the caliper positions. With wearing brake pads and the advanced piston, make sure the pads remain close to the rotor. Hence, you need to get rid of these brake pads and pull the pistons fully.
Check out this video for to watch the process.
Final thoughts
As you can see, how to bleed your mountain bike brakes isn’t that complicated of a process. If you know how everything works and which component goes where you will get through the entire process with ease.
Just make sure that you keep your hands steady throughout the process. You must have the right set of tools at your disposal so that you can perform all the steps correctly. The best part is that you just learned a new skill that will be easier to perform the next time.
Below is a Pinterest friendly photo… so you can pin it to your Mountain Bike Board!
Related Articles
What Does Travel Mean On A Mountain Bike?
Oli L • March 22, 2022
When you start mountain biking you will hear the term "travel" quite a bit. But what the heck is travel and what does it have to do with mountain biking? "Hey, dude, how much travel do you have on your front fork". This is something you will hear often and it's referring to how much suspension you have on your bike. Travel on a mountain bike is the distance you...
What Is A Mountain Bike Dropout?
Oli L • March 1, 2022
The Mountain bike dropout is not a topic of most conversations when it comes to mountain biking. These components are located on the fork-end and features a section in the frame or the fork, where the wheel can quickly be loosened and removed in the need of a wheel change. In more technical terms, it refers to a slot located in the rear axle of the mountain bike, that allows...
How to Manual on a Mountain Bike
Oli L • November 9, 2021
When you're cruising on a mountain bike or pacing through a trail, you face different problems. One such problem is the obstacles that you face while conquering trails. To overcome these obstacles, there's a popular skill that is known as a manual. With a manual, you can pass over these obstacles in style and comfort. And like every skill, this mountain biking skill requires practice. Because without practice, even if...
How To Clean Disc Brakes on A Mountain Bike
Oli L • October 21, 2021
Want to learn how to clean disc brakes on a mountain bike? Here you’ll find out what you can use to clean your mountain bike disc brakes, how to detach the disc brakes and their entire cleaning in your garage. Mountain Bike Disc Brake Cleaning Overview You can clean your mountain bike disc brakes after removing your wheels, wiping those brakes with brake cleaner and a clean rag. You can...
Hydraulic Disc Brakes Vs. Mechanical Disc Brakes
Oli L • September 9, 2021
One of the most common topics in the biking world is "hydraulic disc brakes vs. mechanical disc brakes." And so it should be because most of the bikes either come with hydraulic disc brakes or mechanical ones. Hydraulic disc brakes are the dominant of the two. These brakes are complex but reliable. However, mechanical brakes are under-performing but straightforward than their counterparts. So, which one will be better for your...
Latest Articles
Popular Articles
Product Of The Week
Monday 13th July