How to Change Mountain Bike Tires?
/ Tips / How to Change Mountain Bike Tires?
Mountain bikes are great because they can conveniently handle a range of different terrains. However, if you ride frequently you will have to deal with certain repairs as well. Most of the time it’s the tires that you need to work on because over time the tires wear out and you need to fix them before you revert to your track.
Therefore, you need to know how to fix a deflated tire or you’re in big trouble being left stranded in the middle of a trail on a hot day. You don’t know how far away help is, so it’s better to help yourself.
In this guide, we will show you how to change mountain bike tires using tools as well as your bare hands. So no matter what your scenario is, getting your tires fixed won’t be a challenge.

Changing Your Mountain bike Tire Using Tools
First of all, you need to know what kind of tools you need to change your Mountain bike tires.
Removing The Previous Tire
Primarily, flatten your tire and unscrew the nuts and bolts that are keeping the axle in place. If the nuts are too tight for you to loosen then you need to oil them. Now release the brakes from the socket. It’s time to get the tires out of the frame. If it’s the back wheel then you must adjust the gear to the smallest to unscrew your wheel.
Changing Tubeless Tires
If you are looking to change a tubeless tire of your MTB then you need to deflate it first. Now start squeezing the tire so that the rims come out. When you have removed the tire, check to see what was wrong with it. For better results, you can fill your tire with air and place it inside water. If bubbles appear then you can easily identify the object that has flatten your tire.
The Inner Tube Needs To Be Replaced
You decide to fix the current tube or replace it. You can fix it if you apply a powerful glue to your tube and allow it to dry completely. If you are looking to replace it then you will need a small air pump to inflate the tire.
Changing The Rear Tire On Your Mountain Bike
If you follow the steps properly, removing the rear tire is not a problem at all. Being an MTBer you must know when you need to fix your tire and when you should replace it.
If your bike features disc brakes then you need to adjust it close to your rim. It will make your tire bump into your brake pads. It will especially be the case if your tire is larger or wider than your rim. In case of any linear pulls, a noodle-like ribbon will pop out of the holder if you have side pull brakes.
Another way of doing this is to allow all the air to come out of the tire until you can pinch it. It can be done if you can’t find the brake pads. Now, put your derailleur back on the hand. Your chain will be out of your way and your wheel also won’t hold on to anything.
Clean The Tire On The Inside
You need to see the inside of your tire and clean out any debris. This should be done as soon as you have deflated the tire and going to put it back in its place.
Locating Tears Or Holes
Use a bucket or basin full of water to locate any holes or tears in your tire or tube. You can also bring the hole close to your lips to accurately spot a hole or tear.
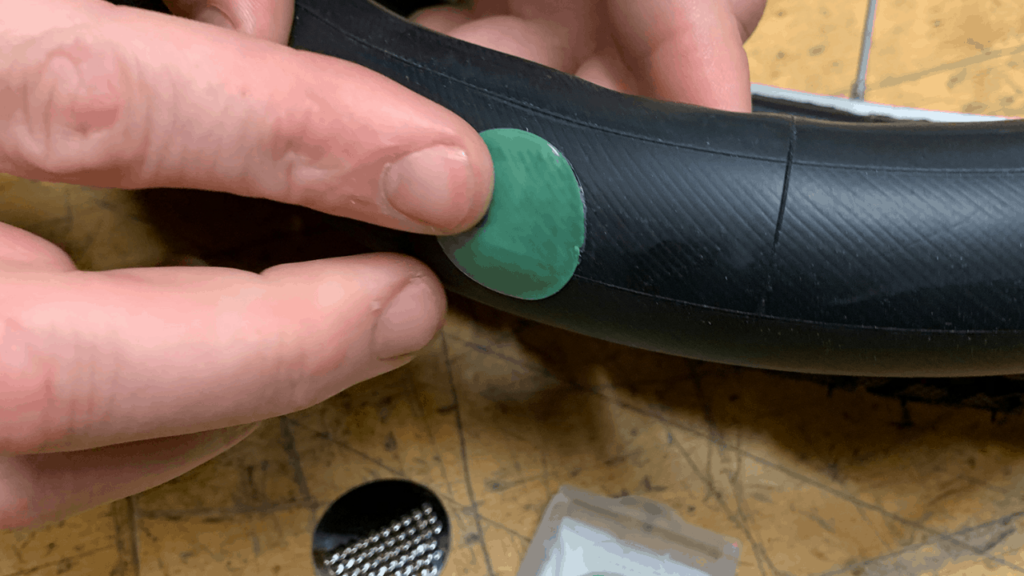
Using The Patch Kit
It’s time to patch the tire up using your patch kit. Ensure that you clean the surface, dry it, and then rough it up for easy patching. Now spread your glue and make it tacky. Press your patch down on it and make some heat available until the glue dries up. Other patching tricks are fairly similar to this way.
Get The Tube Back On Your Wheel
Before you place your valve, center it or it will damage with frequent use. Do not connect it with your brake cables. In the end, double-check whether the tire is centered and the brakes are working or not. You are now all ready to pump up your tire.
How to Change Mountain Bike Tires Without Any Tools
There are times when you need to prepare yourself for changing your Mountain bike tires without using any tools. You might not have any tools on you because you didn’t think of facing any mayhem. And all of a sudden, it’s goes flat. Now you need to be fully equipped with some skills to solve the problem.
Deflate Your Tires
Initially, you need to deflate your tire and if it’s already flat then you can move on to the next step. Most of the time you change your tire when it’s flat. But there are times when the holes are pretty small and you do not realize that the tires are flattening. In such a case get rid of any air from the tire by using the valve. Now squeeze the tire from all sides and loosen it from the rim.
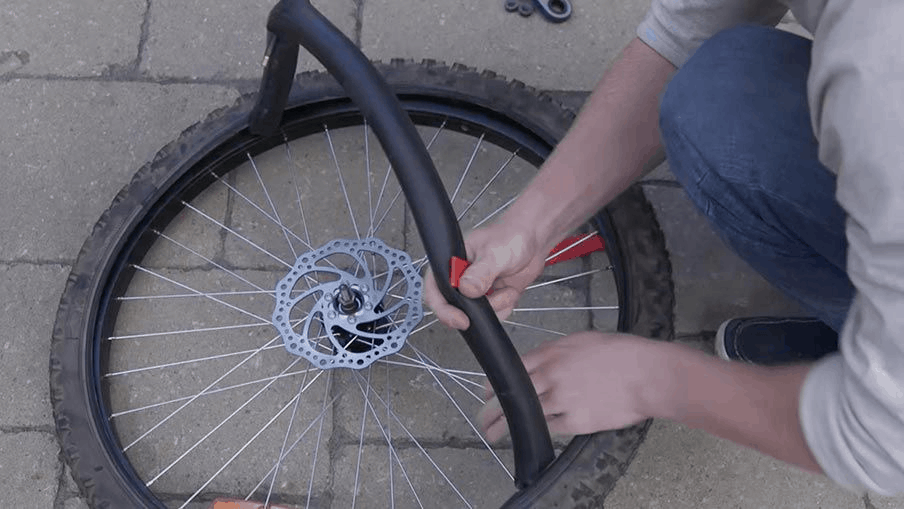
Pull One Side Of Your Tire Off
You will need some of your hand strength here. Place your hand on the tire at least 4-inch apart on one side of it. Now push in and then up with the help of your thumbs. Using your fingers, press the tire and bring its wall over the rim’s side.
Keep your tire’s wall on the outer side of the rim and use your other hand to execute the push in and then up motion. This way the tire will start to get off from the rim. When there is enough of the wall out, slide your fingers in to get the remaining tire off the rim.
Remove Your Tube
Since you have got one side of your tube out, you can remove the rest of it without difficulty. You need to push the stem of your valve up through your rim and pull it from one side. After that, you can start pulling out the rest of it.
Put In Your New Tube
Again, it’s up to you if you want to fix your tube. You need to use your patching kit as we have already described above, or you can put in a new tube. You have to decide when to replace or fix your tube.
Lay your tire and place your tube over it. Get the stem of your valve lined up with the hole. Now squeeze your tire when the value is present. Push your valve right through the hole. Make sure that you push it with as much strength as you can.
It might get stuck so you have to work a bit harder. If your tire doesn’t get back into place, turn its side. Once you are done with the valve, start pushing the rest of the tube and ensure that you don’t twist your tube.
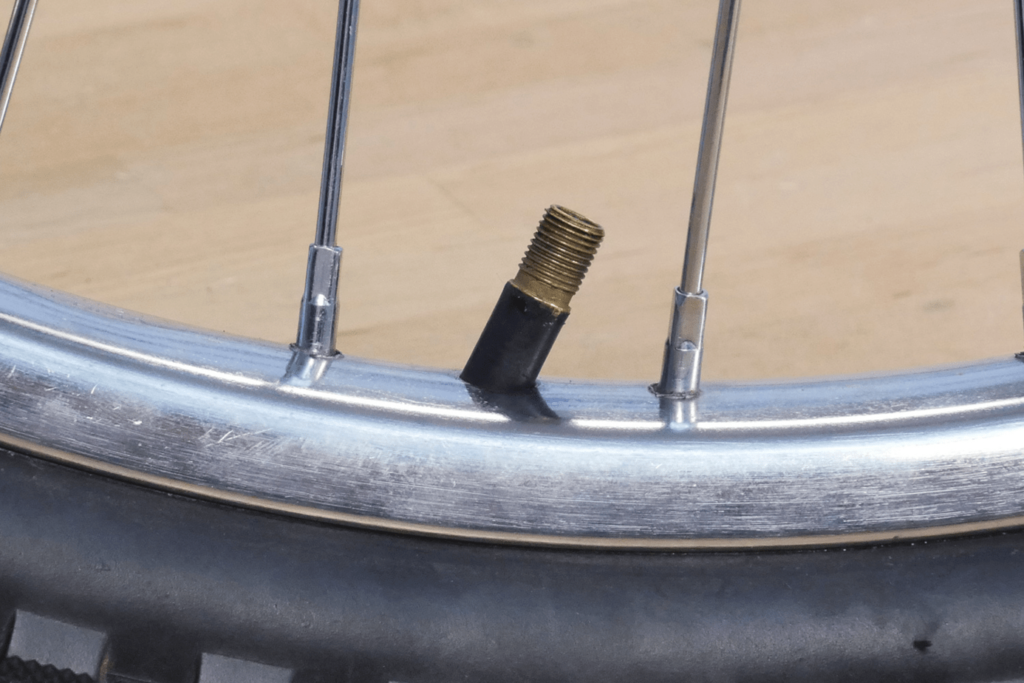
Check to see if the stem of the valve is straight. If it is slightly angled then that’s not going to matter a lot but too much of an angle can damage the valve.
Push The Wall Back In The Rim
Since you have your tube inside the tire now is the time to get the wall back into the rim. It’s just the reverse of what you did when you removed your tube. Just push in the tire side and try to squeeze it over your rim wall.
It’s better to hold the starting point with your one hand and use the other to work on the inner side of the rim. Once it holds itself, you can use both your hands to start working on your remaining tire.
A Word of Advice
You need to be a lot more cautious about a few things to make sure that your entire project goes and concludes smoothly.
- Pay attention when you are taking your tires out of the frame.
- Must place your tube and center it to avoid any damages while riding.
- Don’t use a tire that is 7 years older.
- Don’t over-oil your brakes or the rubber on the brake pads will corrode or decay.
- Check for any leaks while replacing the tube.
- Inflate your tire according to the recommended pressure or it will blow up the tube.
- Using talcum powder before you inflate is a good practice.
- Make sure that you keep your tire away from heat or air inside, this will burst the tire.
- Ensure that you don’t get in contact with your rotor because it can be hot and you might end up burning yourself.
- Verify that you don’t get any oil on your disc brakes.
- Practice getting your MTB wheels on and off as much as possible.
- Add a pair of tweezers to your tire repairing kit to get rid of any small objects.
- Always find the right place to fix your tire.
- Do not block the way of other bikers on the trail.
Final Word
Changing your mountain bike tires is not difficult if you practice regularly. Make a habit of checking your wheels before you hit the trail. Doing this will make you get used to the proceedings and you won’t find it difficult to replace or fix your tube or tire when it’s required.
You must know the appropriate use of tools. Sometimes you are just on a trail nearby and you don’t find it mandatory to take your kit with you. In such a scenario if you get a burst, then you should be able to solve your problem without panicking. However, we advise you to take your kit with you whenever you hit the trail. With these tools, your life will become much easier.
Always carry a spare tube with you and be certain that you don’t use tires that are more than seven years old. Such old tires are not great in terms of reliability and they don’t deliver the performance that you expect from them.
When working on your rear wheels, take care of your gearing system as well as the braking mechanism. You will have to be a lot more cautious when oiling. If your bike has disc brakes then oiling the parts is not a good idea on a hot day.
Fixing can be a good solution when your tire or tube is relatively new. Replacing is a better option when they get old. Now you know how to change mountain bike tires.
Be safe, be prepared out there!
Related Articles
What Does Travel Mean On A Mountain Bike?
Oli L • March 22, 2022
When you start mountain biking you will hear the term "travel" quite a bit. But what the heck is travel and what does it have to do with mountain biking? "Hey, dude, how much travel do you have on your front fork". This is something you will hear often and it's referring to how much suspension you have on your bike. Travel on a mountain bike is the distance you...
What Is A Mountain Bike Dropout?
Oli L • March 1, 2022
The Mountain bike dropout is not a topic of most conversations when it comes to mountain biking. These components are located on the fork-end and features a section in the frame or the fork, where the wheel can quickly be loosened and removed in the need of a wheel change. In more technical terms, it refers to a slot located in the rear axle of the mountain bike, that allows...
How to Manual on a Mountain Bike
Oli L • November 9, 2021
When you're cruising on a mountain bike or pacing through a trail, you face different problems. One such problem is the obstacles that you face while conquering trails. To overcome these obstacles, there's a popular skill that is known as a manual. With a manual, you can pass over these obstacles in style and comfort. And like every skill, this mountain biking skill requires practice. Because without practice, even if...
How To Clean Disc Brakes on A Mountain Bike
Oli L • October 21, 2021
Want to learn how to clean disc brakes on a mountain bike? Here you’ll find out what you can use to clean your mountain bike disc brakes, how to detach the disc brakes and their entire cleaning in your garage. Mountain Bike Disc Brake Cleaning Overview You can clean your mountain bike disc brakes after removing your wheels, wiping those brakes with brake cleaner and a clean rag. You can...
Hydraulic Disc Brakes Vs. Mechanical Disc Brakes
Oli L • September 9, 2021
One of the most common topics in the biking world is "hydraulic disc brakes vs. mechanical disc brakes." And so it should be because most of the bikes either come with hydraulic disc brakes or mechanical ones. Hydraulic disc brakes are the dominant of the two. These brakes are complex but reliable. However, mechanical brakes are under-performing but straightforward than their counterparts. So, which one will be better for your...
Latest Articles
Popular Articles
Product Of The Week
Monday 13th July